![]()
Cheaper Broadband with FreeBSD and DSL
Introduction
In the old days, choices were fairly limited for who wanted to connect to the Internet: it was either a dedicated line (T1 and friends), or a modem connection. Dedicated lines are great but cost an arm and a leg, modems are cheap but slooow. The choice was easily made: companies got T1s, users modems.
The arrival of Digital Subscriber Line (ADSL and its variants, SDSL, etc.) changed everything by blurring the boundary between professional and residential Internet access. Requiring only an ordinary copper pair, offering T1-like speeds, and priced for mere mortals, ADSL allows anyone willing to spend $40 a month to get connected to the Internet at high speed. Cheap broadband!
But one obstacle remains: along with T1 lines usually came a full-blown router, expertly configured and maintained by the ISP who sold you Internet service. With DSL all you get is a flimsy little box, a DSL "modem" that can connect a single computer to the Internet – and it better be running Windows. In this article, we are going to replace that flimsy box with a proven, industrial-strength, open-source, free operating system: FreeBSD.
Let's first look at two typical DSL installations. One uses an internal DSL "modem card" plugged directly into the DSL, the other an external "DSL modem". The latter is by far the most common and is shown in figure 1 (note that this figure is a simplification; the "ISP Router" box encompasses in reality multiple devices, commonly a DSLAM (DSL Access Multiplexer), a BAS (Broadband Access Server), and an IP router).
That "DSL modem" acts as a bridge between your local Ethernet segment and the DSL itself. While the protocol running on the DSL is none of our business, you need to know that the communication between the modem and your computer uses PPP over Ethernet (Other protocols can be used also, e.g. PPTP, but this article deals only with PPPoE, by far the most common).
The goal of this article is to walk you through the steps involved in setting up a complete configuration allowing you to connect your FreeBSD computer to the Internet via DSL. We will also discuss how to setup that same machine as a gateway providing Internet access to a small internal network.
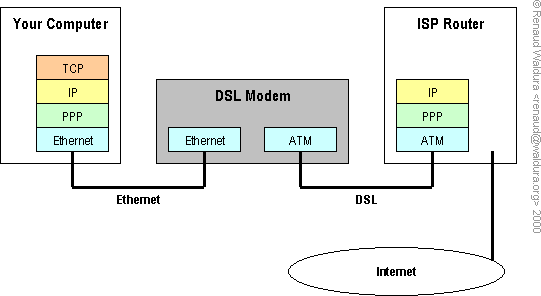
Figure 1. A typical DSL installation.
0. Pre-requisites
Before diving head first into the technicalities of PPPoE on FreeBSD, let's make sure some basics are met. To complete the setup detailled in this article, you'll need:
- a working DSL line, i.e. activated by the provider selling you DSL service.
- some sort of device (sometimes called a modem, a bridge, or even a router) used to connect your computer to the DSL.
- a PPP account (authenticated with PAP or CHAP), also activated by the provider.
- a computer running FreeBSD 4.0 or later
- at least one Ethernet NIC (adapter, card) in the machine. This interface will be designated eth0 from now on.
1. Kernel configuration
The kernel you are going to be using for this project must be configured with:
pseudo-device tunand
options NETGRAPHThis is not the case for the GENERIC kernel included in FreeBSD 4.0; you will have to rebuild a kernel in order to be able to use PPPoE. Please refer to the FreeBSD Handbook, section Configuring the FreeBSD Kernel for help in doing this.
Once your kernel is rebuilt with these options, make sure the
corresponding tun devices are present on your system:
$ ls -l /dev/tun?
crw-------  1 uucp  dialer   52,   0 May 17 10:59 /dev/tun0
crw-------  1 uucp  dialer   52,   1 Nov 19  1996 /dev/tun1
crw-------  1 uucp  dialer   52,   2 Nov 19  1996 /dev/tun2
crw-------  1 uucp  dialer   52,   3 Nov 19  1996 /dev/tun3
If not, they can be created with:
# cd /dev
# ./MAKEDEV tun{0,1,2,3}
2. PPP configuration
Okay, now let's do it. First make a backup copy of the existing
/etc/ppp/ppp.conf file, then edit it to conform to example
1.
#
# ppp.conf: PPPoE configuration
#

default:
 # PPP over Ethernet
 set device PPPoE:eth0
 set speed sync
 set mru 1492
 set mtu 1492
 set ctsrts off

 # monitor line quality
 enable lqr

 # log just a bit
 set log phase tun

 # insert default route upon connection
 add default HISADDR

 # download /etc/resolv.conf
 enable dns

papchap:
 set authname USERNAME
 set authkey PASSWORD
Example 1. The ppp.conf configuration file.
USERNAME and PASSWORD above should be replaced with your actual username and password, respectively. Also replace eth0 with your actual Ethernet interface.
The interface eth0 used by PPPoE must be UP, i.e. enabled. It is only used as transport, and does not need to be assigned an address. Eg:
$ ifconfig eth0
eth0: flags=8843<UP,BROADCAST,RUNNING,SIMPLEX,MULTICAST> mtu 1500
	ether 00:44:27:f6:9c:93
If the flags section above doesn't list UP, bring the interface up with:
# ifconfig eth0 upand you should be all set for the next step.
3. Running PPP for the first time
We are going to make a first attempt at running ppp without authentication. This test will only verify your DSL configuration and will not create a working connection yet. See example 2.
# /usr/sbin/ppp
ppp ON myhost> set log +debug

ppp ON myhost> show physical
Name: deflink
 State:           closed
 Device:          N/A
 Link Type:       interactive
 Connect Count:   0
 Queued Packets:  0
 Phone Number:    N/A

Defaults:
 Device List:     "PPPoE:eth0"
 Characteristics: sync, cs8, no parity, CTS/RTS off
 CD check delay:  device specific

Connect time: 0:00:00
0 octets in, 0 octets out
Overall 0 bytes/sec

ppp ON myhost> dial

ppp ON myhost>
Ppp ON myhost>
ppp ON myhost>
Example 2. A first run of ppp.
Note how the first P of the ppp prompt becomes capitalized, indicating that the LCP phase was successfully completed. The next phase, authentication, fails, since you have not provided a username and password yet.
If this first P fails to become capitalized, you need to look at
/var/log/ppp.log and figure out what went wrong. Since
debugging output was activated with set log +debug above,
there should be lots of information there. Sift through the file and
pinpoint the exact point of failure. I try to give some starting points in
the Errors
section below.
3. A complete PPP run
You have completed the purposefully incomplete ppp run above, now you should be able to go all the way, get authenticated and connected. This is what we do in example 3.
 # /usr/sbin/ppp papchap
ppp on myhost> set log +debug
ppp ON myhost> dial
ppp ON myhost>
Ppp ON myhost>
PPp ON myhost>
PPP ON myhost>
Example 3. A completed run of ppp.
Note how the three "P" of the prompt are now capitalized, indicating that you have successfully completed the LCP phase (first P), you are successfully authenticated (second P), and your machine was assigned an IP address (third P). This constitutes the complete PPP connection process, and your machine is now online. Woo-hoo!
4. Testing
Now that you are successfully connected, we can start running some
tests on your connection. Suspend your ppp process with
^Z, and have it run in the background with bg (or just
switch to another terminal). Then run ifconfig again:
$ ifconfig tun0
tun0: flags=8051<UP,POINTOPOINT,RUNNING,MULTICAST> mtu 1492
        inet LOCAL_ADDR --> PEER_ADDR netmask 0xff000000
        Opened by PID 4714
PEER_ADDR above is the actual address of the next device
in your network path, usually it is your ISP's router.
LOCAL_ADDR is your actual IP address, the one assigned to your
FreeBSD machine by the ISP.
4.1. Pinging the remote end of the link
First you need to make sure that you can ping the PEER_ADDR. Failing this test would indicate serious trouble with your configuration, most probably DSL-related, in which case you will have to talk to your ISP to resolve them.
$ ping PEER_ADDR
PING PEER_ADDR (PEER_ADDR): 56 data bytes
64 bytes from PEER_ADDR: icmp_seq=0 ttl=64 time=50.033 ms
64 bytes from PEER_ADDR: icmp_seq=1 ttl=64 time=45.788 ms
64 bytes from PEER_ADDR: icmp_seq=2 ttl=64 time=36.395 ms
^C
--- PEER_ADDR ping statistics ---
3 packets transmitted, 3 packets received, 0% packet loss
round-trip min/avg/max/stddev = 36.395/44.072/50.033/5.698 ms
4.2. Pinging a remote host by address
This second test will have you ping a remote host by address, skipping DNS resolution entirely. Its goal is to check the network path beyond your DSL link.
$ ping 198.41.0.4
PING 198.41.0.4 (198.41.0.4): 56 data bytes
64 bytes from 198.41.0.4: icmp_seq=0 ttl=246 time=521.867 ms
64 bytes from 198.41.0.4: icmp_seq=1 ttl=246 time=547.583 ms
64 bytes from 198.41.0.4: icmp_seq=2 ttl=246 time=533.596 ms
^C
--- 198.41.0.4 ping statistics ---
4 packets transmitted, 3 packets received, 25% packet loss
round-trip min/avg/max/stddev = 521.867/534.349/547.583/10.512 ms
If this test fails, look up your routing table:
$ netstat -nr
Routing tables

Internet:
Destination        Gateway            Flags      Netif Expire
default            PEER_ADDR          UGSc       tun0
PEER_ADDR          LOCAL_ADDR         UH         tun0
127.0.0.1          127.0.0.1          UH          lo0
The default route must point to the PEER_ADDR (i.e. the remote end of the link) in order for your packets to flow out to the Internet. If it does not, add a default route manually:
# route add default PEER_ADDR
Note how the remote router is accessible only through the tun0 interface, the LOCAL_ADDR just assigned to you. With interfaces:
myhost -----> tun0 -----> eth0 --> ISP routerWith addresses:
127.1 ------> LOCAL_ADDR -------> PEER_ADDRAs I said earlier, any address assigned to eth0 is unused for the purpose of this connection; do not assign an address to eth0.
4.3. Pinging a remote host by name
This is a complete test that will also check your DNS settings.
$ ping a.root-servers.net
PING a.root-servers.net (198.41.0.4): 56 data bytes
64 bytes from 198.41.0.4: icmp_seq=0 ttl=246 time=622.007 ms
64 bytes from 198.41.0.4: icmp_seq=1 ttl=246 time=524.337 ms
64 bytes from 198.41.0.4: icmp_seq=2 ttl=246 time=504.818 ms
^C
--- a.root-servers.net ping statistics ---
3 packets transmitted, 3 packets received, 0% packet loss
round-trip min/avg/max/stddev = 504.818/550.387/622.007/51.266 ms
In order for ping to find the address for a.root-servers.net, your
/etc/resolv.conf must be correct. In section 1. PPP
Configuration above, we told ppp to get the proper DNS values
from your provider with enable DNS. Unfortunately not all
providers enable this, in which case you may have to create this file
yourself.
If your ping command above fails with:
ping: cannot resolve a.root-servers.net: Host name lookup failureyou need to manually create a
resolv.conf file. Do so
by entering your ISP's DNS servers: # echo "nameserver 10.1.1.1" > /etc/resolv.conf # echo "nameserver 10.1.1.2" >> /etc/resolv.confOf course, 10.1.1.1 and 10.1.1.2 above are to be replaced with the actual addresses given to you by your ISP.
5. Connecting automatically
Once you have completed this test connection, you are ready to modify the system files to enable automatic connection when your FreeBSD machine is started.
Edit /etc/rc.conf and add the lines in example 4.
ifconfig_eth0=up

# PPPoE for DSL
ppp_enable=YES
ppp_mode=ddial
Example 4. The rc.conf configuration file.
When in mode ddial, ppp will bring the link back up
any time it is dropped. Even if you wish to have the machine permanently
connected to the Internet, the PPP connection is bound to get dropped due
to actions beyond your control; e.g. the ISP router might drop the
connection. Using ppp_mode=ddial tells ppp to always
re-connect as soon as possible; this will result in an infinite re-dialing
loop if your service is shut down!
At this point, you may reboot the computer for testing purposes, or you can run:
# /usr/sbin/ppp -ddial papchapto establish a long-lasting connection.
6. Connecting multiple computers
6.1. Multiple PPPoE sessions
PPPoE is capable of managing multiple concurrent PPP sessions on the same link: client machines can share the DSL by being connected to a common Ethernet segment that is plugged into the DSL modem. See figure 2.
Although I have not personnally tried this setup, it seems like a fast and easy way to have many computers share the DSL. Of course your provider must allow it, and it offers no additional network security.
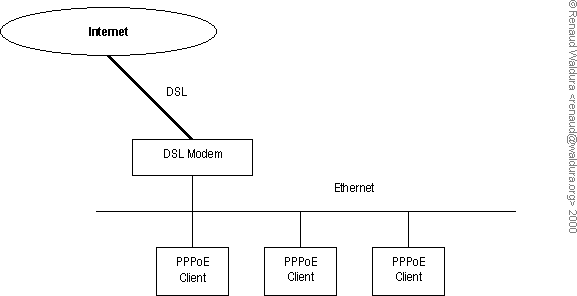
Figure 2. Multisession PPPoE configuration.
6.2. A FreeBSD gateway
Your FreeBSD box can easily be used as a gateway to allow multiple computers to share your DSL connection to the Internet. It is a noticeably better solution than the one exposed above for the following reasons:
- you do not have to get approval from your provider, a.k.a. having to pay extra for the same service. In fact, they will never even know you are running an internal network, which is often what you want.
- the gateway can easily be configured as a firewall, providing excellent security to the internal network.
- if the gateway is always powered up and keeps the DSL connection open, client machines get instant Internet access, without having to go through the PPP connection/authentication process.
- it can solve a real problem with Path MTU Discovery, discussed below.
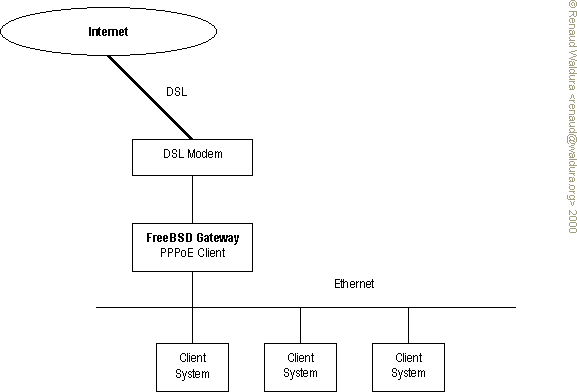
Figure 3. Configuration with PPPoE gateway.
There are two ways of enabling this configuration: pay your ISP extra dollars for a business-type DSL service that gives you multiple static IP addresses, or implement example 5. Needless to say, the latter is cheaper, easily made more secure, and also more fun.
ifconfig_eth0=up

# PPPoE for DSL
ppp_enable=YES
ppp_mode=ddial

# this machine is a NAT gateway
gateway_enable=YES
ppp_nat=YES
Example 5. The rc.conf configuration file for a gateway.
Although these are really the only mandatory changes, please refer to the FreeBSD Handbook, section Gateways & Routes for more information on setting up FreeBSD as a gateway.
6.3. PPPoE and Path MTU Discovery
6.3.1. Presentation of the problem
A potential problem with the last configuration (FreeBSD gateway with PPPoE clients) manifests itself in the following manner: client systems become unable to access certain Web sites. A Web browser stops in mid-download of pages, or does not access the site at all. Initially quite puzzling, it quickly becomes a major annoyance.
I ran into the problem with various sites, netscape.com, wellsfargo.com and paypal.com. The sites are accessible from the gateway machine, but not from client systems located behind the gateway. A network trace with tcpdump does not show anything abnormal, apart from no packets making their way back to your system.
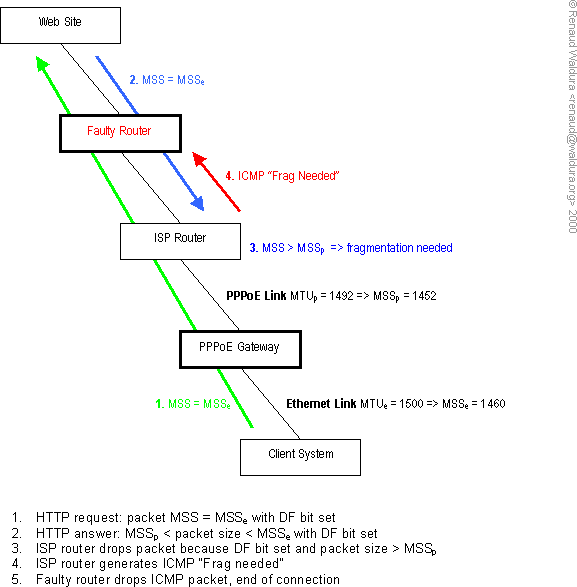
Figure 4. A faulty network device drops ICMP messages required for PMTU.
But let's explain what's going on. Your client systems implement Path MTU Discovery by sending TCP packets with the "Do not fragment" bit set and a large TCP Maximum Segment Size derived from the local MTU value (a complete description of Path MTU Discovery can be found in RFC 1191). Since your clients are connected to an Ethernet, their packets are sent with a MSS = MTU(Ethernet) - 40 = 1460.
Unfortunately, because of the additional encapsulation, your PPPoE link has an MTU smaller than the Ethernet MTU. It is not an issue on the way up, from your client to the Web site, because the client is only sending a HTTP request, which typically fits inside one packet, smaller than the MTU. But on the way back down, the web site is sending large packets (the Web page, or the file, that was requested).
Whenever a data packet larger than the MTU
Unfortunately, if that ICMP message does not make it back to the originator of the packet, or is not generated by the router, the originating Web site will not resend those packets, and they will never be received by the client. Sometimes the problem is blocked ICMP traffic, sometimes it is a misconfigured ISP router that does not send ICMP "Frag needed" messages. The end result is the same: the client does not receive the Web page it requested.
Why does this happen with PPPoE? Because your data packets are encapsulated into a PPP datagram, and then into an Ethernet frame, resulting in additional overhead; while most Internet links have at least 1500 bytes of MTU, your DSL link has less because of the encapsulation. It is worth emphasizing that this behavior is not a design error in any way: the problem really only stems from having misconfigured (or buggy) network devices in the path.
I have heard that some DSL providers (e.g. UUNet) attack the problem at its root by contacting Web site owners and misconfigured ISPs. Since such a large scale approach is not suited to anyone but the largest network operators, I will explore in the following sections what you can do by yourself to solve this issue.
6.3.2. A simple, client-side fix
See also the FreeBSD FAQ for another, shorter description of the problem. A fix is also offered, a change to the Windows registry to lower the client MTU; see table 1.
| OS | Key | Type | Value | Comment |
|---|---|---|---|---|
| Windows 95 Windows 98 | HKEY_LOCAL_MACHINE
\System
\CurrentControlSet
\Services
\Class
\NetTrans
\N
\MaxMTU
| String | 1450 or 1492 | change N to match your adapter. |
| Windows NT | HKEY_LOCAL_MACHINE
\SYSTEM
\CurrentControlSet
\Services
\Adapter
\Parameters
\Tcpip
\MTU
| DWORD | 1450 or 1492 | change Adapter to match your adapter. |
| Windows 2000 | HKEY_LOCAL_MACHINE
\SYSTEM
\CurrentControlSet
\Services
\Tcpip
\Parameters
\Interfaces
\interface
\MTU
| DWORD | 1448 - 1492 | change interface to match the adapter. |
Table 1. MTU registry key for Windows.
6.3.3. A better fix
NOTE: THIS SECTION IS OUTDATED
As of December 2000, ppp now understands the option
tcpmssfixupwhich implements what tcpmssd does below. This version of ppp is included in FreeBSD >= 4.3. This feature is enabled by default, but you can still add it anyway:enable tcpmssfixupto yourppp.conf. And that's all you have to do! (no need to futz with the kernel configuration either). Of course the explanation of what's going on is still valid.
Unfortunately the fix above needs to be applied to every single client system located behind your gateway. A better solution has been worked out by Patrick Bihan-Faou, Ruslan Ermilov and the freebsd-net gang: it involves running a very small daemon tcpmssd on your PPPoE gateway that corrects the TCP Maximum Segment Size of packets on the fly, setting it to the actual MTU size. It will also track MTU changes in case it gets re-negotiated by ppp.
Figure 5 shows what happens with this patch. Compare with the broken case shown in figure 4.

Figure 5. Tcpmssd corrects MSS of outgoing packets and prevents problem.
To implement this fix, we will use a divert rule that
redirects all packets to tcpmssd. In order to use divert(4)
sockets, we need in the kernel configuration:
options         IPFIREWALL              # firewall
options         IPFIREWALL_VERBOSE      # print information about dropped packets
options         IPFIREWALL_VERBOSE_LIMIT=100    # limit verbosity
options         IPDIVERT                # divert(4) sockets
Then install tcpmssd from the Ports collection. Create or modify your
/etc/ppp/ppp.linkup to
include: MYADDR:
# start MSS correction daemon
! /usr/local/etc/tcpmssd.rc start INTERFACE
and in /etc/ppp/ppp.linkdown: MYADDR:
# stop MSS correction daemon
! /usr/local/etc/tcpmssd.rc stop INTERFACE
The program tcpmssd.rc is a very simple wrapper for tcpmssd that we use to prevent cluttering the ppp configuration files.
#!/bin/sh
#
# Manage TCP MSS correction daemon "tcpmssd".
#

# commands
IPFW=/sbin/ipfw
KILL=/bin/kill
CAT=/bin/cat
TCPMSSD=/usr/local/sbin/tcpmssd

# arguments
ACTION=$1
INTERFACE=$2

# process ID
PID_DIR=/var/run
PID_FILE=$PID_DIR/tcpmssd.$INTERFACE.pid

# divert socket
DIVERT_PORT=1234
DIVERT_RULE_ID=1001
DIVERT_RULE="divert $DIVERT_PORT tcp from any to any out xmit $INTERFACE setup"


case $ACTION in
start)
        $IPFW add $DIVERT_RULE_ID $DIVERT_RULE
        $TCPMSSD -p $DIVERT_PORT -i $INTERFACE
        ;;
stop)
        $KILL `$CAT $PID_FILE`
        $IPFW del $DIVERT_RULE_ID
        ;;
esac
The tcpmssd.rc program.
You can test your setup by running tcpdump on your PPPoE interface tun0:
# tcpdump -n -i tun0 'tcp[13] & 2 != 0'
21:22:44.047937 A.1928 > B.80: S 3565400197:3565400197(0) win 16384 <mss 1452> (DF)
21:22:44.104383 B.80 > A.1928: S 1495988851:1495988851(0) ack 3565400198 win 17424 <mss 1460> (DF)
21:22:44.479268 A.1929 > B.80: S 3565621181:3565621181(0) win 16384 <mss 1452> (DF)
21:22:44.624033 B.80 > A.1929: S 1496107312:1496107312(0) ack 3565621182 win 17424 <mss 1460> (DF)
21:22:45.208895 A.1930 > B.80: S 3565906281:3565906281(0) win 16384 <mss 1452> (DF)
21:22:45.334118 B.80 > A.1930: S 1496339498:1496339498(0) ack 3565906282 win 17424 <mss 1460> (DF)
21:22:46.128208 A.1931 > B.80: S 3566228502:3566228502(0) win 16384 <mss 1452> (DF)
21:22:46.202879 B.80 > A.1931: S 1496659049:1496659049(0) ack 3566228503 win 17424 <mss 1460> (DF)
The expression
tcp[13] & 2 != 0 shows SYN packets
only. Note how the MSS of data packets is lowered from 1460 (the default
value for Ethernet) to 1452 (the correct value for PPPoE). An 8-byte
difference that changes everything.
7. Having a fixed DNS name for your dynamic address
Your box is now connected to the Internet with a dynamic IP address, meaning that it will change every time you dial in. It's really nothing of a problem as long as you only want to get "out" to the Internet, i.e. for Web browsing, FTP downloads, etc. But it is a little bit of an annoyance if you are providing any services on that machine (running a HTTP server), or if you want to be able to access it remotely (through telnet or ssh).
One solution is to pay for a static IP address, but that's too easy and not much fun.
Another solution is to use a public DNS service, such as Granite Canyon Central Info, DynDNS.com, or DynDNS.org. As far as I know,, they all work just fine, but are entirely manual: every time your address changes, you have to go to the site's page, and manually update your name to address mapping. It quickly gets tiring.
Another way is to use true Dynamic DNS, allowing a DNS server to be updated remotely, by program. For example, every time your connection is up, your DNS server would be updated automatically with your new address, ensuring that whatever name you gave your machine is always correct, points to the right address.
I will explore the new features and possibilities of Dynamic DNS in a future article. Stay tuned!
A. Errors
tun0: Phase: deflink: write (1): Network is unreachable- Your configuration file
/etc/ppp/ppp.confis wrong. Make sure you comment out or remove theset dialline. Also check your connections and cabling. Operation not permitted- This error has two possible sources:
- missing kernel code: double-check your kernel configuration, do
not forget to run
make dependin the compilation directory. - running with secure levels enabled: modify the security level,
usually set in
/etc/rc.confand reboot; the security level cannot be lowered. See init(1).
- missing kernel code: double-check your kernel configuration, do
not forget to run
B. References
- Udo Erdelhoff's excellent article about FreeBSD on ADSL with T-Online in Germany is somewhat more detailled and well worth reading – if you can read German that is.
- The FreeBSD FAQ has an answer to the MTU problem.
- The excellent ppp(8) manpage answers most questions about PPP and PPPoE, thanks to its developer Brian Somers.
/etc/defaults/rc.conffor more ppp options.- The FreeBSD Handbook and the FreeBSD FAQ.
- The DSL Forum General FAQs and Technical FAQs; two very interesting documents very worth reading if you wish to learn more about ADSL.
- Marc Slemko's seminal article on Path MTU Discovery and Filtering ICMP.
- RFC 1191 - Path MTU Discovery.
- Q158474 - Windows TCP/IP Registry Entries.
- Windows 2000 TCP/IP Implementation Details.
C. About the author
Renaud Waldura is a freelance consultant specializing in Internet applications. With a Master's in Software Engineering and 7 years of experience in the business, Renaud is able to tell a good piece of software when he sees one: FreeBSD is one of them. Visit Renaud's Web site at http://renaud.waldura.com/ to learn more about how he can help you with your business.
Last modified: 2002/07/22 06:28:52 $